
 PowerPoint- How to make a video/convert to video
By Shannon Glennon
After transitioning to online learning this past spring, and updating to Microsoft Office 365 Pro Plus, by far one of the most utilized new features available to us in Office 365 is the video capability in PowerPoint. Now you are able to take a PowerPoint presentation and convert it to a video to upload to YouTube, or any other video service. With older versions of PowerPoint we were still able to have some video capabilities, but the functionality is much richer and contains many new features in PowerPoint for Office 365. Here I will explain how to add narrations, a video on top of your slides, and package it all up as a video to use however you choose.
With your PowerPoint presentation open, click on Slideshow to view the ribbon.
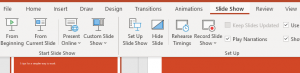
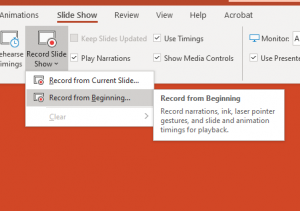
Click on record slideshow.
You can either record from the current slide or the beginning- I recommend recording from the beginning, but this depends on your specific needs.
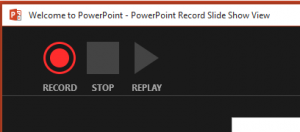
A new window will open in the PowerPoint Record Slide Show View. You’ll notice buttons at the top left.
Far left button to record, middle to stop recording, right to play your recording back to you can preview how it looks/sounds.
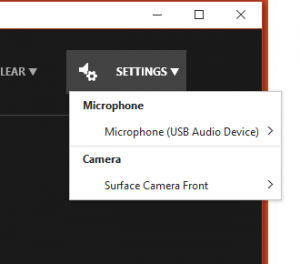
By clicking on Settings at the top right you’ll have the options to choose your microphone and camera.
If you choose to select your camera, you’ll see yourself showing up in a small video box on the bottom right of this screen to and you’ll be able to add the video you record to your slides.
On the bottom right of this window, you’ll have options where you can turn your microphone and camera on and off, depending on your preference. (In the photo shown I have my microphone on and camera off, for reference.)

In the bottom middle of this window you have a pen and a highlighter available to use. You can highlight or write/circle items on your slide as you’re going through your presentation- those different animations will stay within each slide.

Now you can record yourself going through your presentation.. either just speaking through it or also on video if you choose.
When you are ready, go ahead and press record, and run through your presentation.
When finished- click on stop button that we previously noted at the top left. You’ll be able to see a counter that shows the length of time recorded at the bottom left of this window. Click X at top right to close this out.
Now that you’ve finished recording in the Record Slide Show window you’ll be back on the main slide view. Now you are able to click and drag your video box to move it to your preferred location within each slide. You can click the play button at the bottom right to play your video/audio on each slide. But you will still have to manually advance through the slides.
You have the option to prep your presentation with your recorded video/audio as a package video. To do this, click on the File tab, click export, create a video.
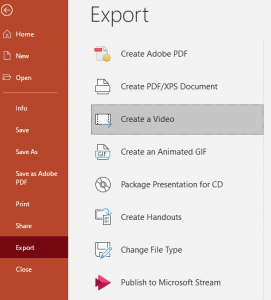
Under Create a Video, you’ll need to choose your I could choose your video quality. I recommend choosing Ultra HD or Full HD for optimal quality, but you’ll need to make this choice depending on your specific presentation, also taking file size into considering. Once you’ve chosen your file size, make sure to always choose “use recorded timings and narrations”, then click Create Video. Choose a location to save your video.
It’s going to take a little bit of time render.. you can view your progress in the bottom right corner of the screen. Depending on how long your presentation is, how many slides you have, and how much narration is included it might take a bit of time to go through and render, so allow for this process to complete before continuing.
You will be notified when your video is finished rendering, which will be separate from your PowerPoint presentation. Simply go to the location where you previously chose to save the video and enjoy!